
Monday, November 19, 2012
Tuesday, August 21, 2012
Mango Salsa
INGREDIENTS1 ripe mango, peeled, pitted, and diced (about 1 1/2 cup) (See: How to Cut a
Mango)
1/2 medium red onion, finely chopped
1 Jalapeño chile, minced (include ribs and seeds for a hotter taste if desired)
1 small cucumber, peeled and diced (about 1 cup)
3 Tbsp fresh cilantro leaves, chopped
3 Tbsp fresh lime juice
Salt and pepper to taste
Also good with diced red bell pepper and jicama.
METHOD
Combine all of the ingredients in a bowl. Season to taste with salt and pepper. If the salsa
ends up being a little too hot or acidic for your taste, you can temper it by adding some
diced avocado.
From Simply Recipes http://simplyrecipes.com
Tuesday, August 14, 2012
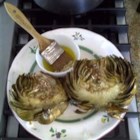
Grilled Garlic Artichokes
Grilled Garlic Artichokes
|
 |
Submitted By: rosiella
Photo By: Cups N' Cake
|
"No more dipping artichokes in mayo! These artichokes are grilled with a lemon garlic basting sauce. This is the best way to eat artichokes."
INGREDIENTS:
2 large artichokes
1 lemon, quartered
3/4 cup olive oil
|
4 cloves garlic, chopped
1 teaspoon salt
1/2 teaspoon ground black pepper
|
DIRECTIONS:
| 1. | Fill a large bowl with cold water. Squeeze the juice from one lemon wedge into the water. Trim the tops from the artichokes, then cut in half lengthwise, and place halves into the bowl of lemon water to prevent them from turning brown. |
| 2. | Bring a large pot of water to a boil. Meanwhile, preheat an outdoor grill for medium-high heat. |
| 3. | Add artichokes to boiling water, and cook for about 15 minutes. Drain. Squeeze the remaining lemon wedges into a medium bowl. Stir in the olive oil and garlic, and season with salt and pepper. |
| 4. | Brush the artichokes with a coating of the garlic dip, and place them on the preheated grill. Grill the artichokes for 5 to 10 minutes, basting with dip and turning frequently, until the tips are a little charred. Serve immediately with the remaining dip. |
Don't forget to remove the choke!!
If you aren't that familiar with artichokes
Thanks again to Cinthia Irvine for sharing this yummy recipe.
Mango Pie (healthy, raw, YUMMY!)
You need a food processor and blender.
PIE Crust-
1 1/2 cup of your favorite nuts (I like almonds, cashews or macadamia).
3/4 cup dates
1 tbsp of honey or agave
pinch of salt
Put in food processor until all ground up and fine. Put in pie pan,smash it all down with hands, put in freezer until next step.
Filling-
4 mango's
2/3 cup coconut oil (melted)
Put in blender until creamy. Pour filling over crust. Stick in freezer until firm. Then eat!
I made this once using fresh pineapple and strawberries instead of mango. You could do any fruit you want. Good luck and let me know how you like this.
You could also just make the filling, put it in your freezer and eat as an ice cream or put in your fridge and eat as pudding. There is so much you can do with this simple recipe:)
Special Thanks to Cinthia Irvine for the recipe :-)
Saturday, July 14, 2012
Cilantro Lime Dressing
Ingredients:
1/8 c. fresh lime juice (about 2-3 juicy limes)
1/8 c. white wine vinegar or rice vinegar
1 tsp. sugar
1/2 c. canola oil
1/4 c. roughly chopped cilantro, stems removed
1/8 c. white wine vinegar or rice vinegar
1 tsp. sugar
1/2 c. canola oil
1/4 c. roughly chopped cilantro, stems removed
Instructions:
In the jar of your blender, combine lime juice, vinegar, and
sugar. Blend until ingredients are completely combined. With the blender
running, add the oil in a steady stream. Add cilantro and blend until the
cilantro has broken down but still maintains some of its texture. Serve with
greens, on any type of Mexican salad, or use as a marinade.
Monday, July 2, 2012
Delivery this week will be July 3rd
Just fyi, we are having produce delivered on July 3rd instead of the 4th this week. Some of you have let me know to skip delivery but if you haven't let me know and need to skip please sell your basket or give it to someone. I have to order this morning.
Thanks,
Alicia Connell
Thursday, May 17, 2012
How to Cook and Eat an Artichoke
This is from simplyrecipes.com- one of my favorite food websites:
http://simplyrecipes.com/recipes/how_to_cook_and_eat_an_artichoke/
I can imagine, that if you didn't grow up eating artichokes and if you were encountering them for the first time, they might seem a little intimidating. How one cooks and eats an artichoke is not obvious from its appearance. If you've always wondered how to cook and eat them, here are the steps:
How to Cook an Artichoke:
1. If the artichokes have little thorns on the end of the leaves, take a kitchen scissors and cut off the thorned tips of all of the leaves. This step is mostly for aesthetics as the thorns soften with cooking and pose no threat to the person eating the artichoke.
2. Slice about 3/4 inch to an inch off the tip of the artichoke. (This step is optional)
3. Pull off any smaller leaves towards the base and on the stem.
4. Cut excess stem, leaving up to an inch on the artichoke. The stems tend to be more bitter than the rest of the artichoke, but some people like to eat them.
5. Rinse the artichokes in running cold water.
6. In a large pot, put a couple inches of water, a clove of garlic, a slice of lemon, and a bay leaf (this adds wonderful flavor to the artichokes). Insert a steaming basket. Add the artichokes. Cover. Bring to a boil and reduce heat to simmer. Cook for 25 to 45 minutes or until the outer leaves can easily be pulled off. Note: artichokes can also be cooked in a pressure cooker (about 15-20 minutes cooking time). Cooking time depends on how large the artichoke is, the larger, the longer it takes to cook.
How to Eat an Artichoke:
Artichokes may be eaten cold or hot, but I think they are much better hot. They are served with a dip, either melted butter or mayonaise. My favorite dip is mayo with a little bit of balsamic vinegar mixed in.
1. Pull off outer petals, one at a time.
2. Dip white fleshy end in melted butter or sauce. Tightly grip the other end of the petal. Place in mouth, dip side down, and pull through teeth to remove soft, pulpy, delicious portion of the petal. Discard remaining petal. Continue until all of the petals are removed.
3. With a knife or spoon, scrape out and discard the inedible fuzzy part (called the "choke") covering the artichoke heart. The remaining bottom of the artichoke is the heart. Cut into pieces and dip into sauce to eat (or just bite straight from the stem)
Wednesday, May 16, 2012
Artichoke Pasta with Alfredo
I usually make this with bottled artichoke hearts - because that's what I have. But a quick google search tells me how to cook the artichoke and work with just the hearts. (Click the link for video instructions or written instructions on a few ways to cook an artichoke.)
So I'm excited to use fresh artichokes for one of my favorite recipes this week!
Ingredients:
So I'm excited to use fresh artichokes for one of my favorite recipes this week!
Ingredients:
- Pasta (bowtie or rotini)
- Chicken (boiled and shredded)
- Peas, frozen
- Artichoke Hearts
- Alfredo Sauce (a bottle, or the delicious recipe below)
- 2 c low fat milk
- 1/3 c low fat cream cheese
- 2 Tbsp flour
- 1 tsp kosher salt
- 1 Tbsp butter
- 3 garlic cloves
- 1 c freshly grated parmesan cheese
Directions:
Alfredo Sauce
- In a blender, blent the milk, cream cheese, flour and salt until smooth and set aside.
- In a large nonstick saucepan, melt butter on medium high heat and add the garlic. Saute the garlic for about 30 seconds, stirring constantly to prevent the garlic from sticking and burning.
- Add the milk mixture to the pan. Stir constantly for 3-4 min or until it just comes to a simmer. Keep stirring and let it cook for a few minutes more or until the sauce thickens, about 6-7 min.
- Once the sauce has started to thicken, remove from heat. Whisk the cheese into the sauce and immediately cover the pan.
- Allow the sauce to stand for at least 10 min before using. It will continue to thicken upon standing.
- Serve immediately. Refrigerate leftovers for up to 5 days. The sauce will become very thick once refrigerated. To use it, reheat the sauce and add a little milk until the desired consistency is reached.
Pasta
- Cook chicken & shred it.
- Cut up artichokes & warm the peas.
- Combined cooked pasta with chicken, artichokes & peas.
- Add Alfredo Sauce & mix well.
- Serve warm with delicious bread & a salad! (the come back and tell me how much you loved it.)
Tuesday, April 24, 2012
Produce ordered for April 25th
Fuji apples, Gala apples, Avocados, Bananas, Strawberries, Broccoli Crowns, Carrots, Cucumbers, Kiwi, Lemons, Green Onions, Oranges, Spinach, Yellow Squash, Zucchini, Tomatoes
Tuesday, April 17, 2012
Produce for April 18th
Fuji apples, Gala Apples, Avocados, Bananas, Strawberries, Broccoli, Grapefruit, Jicama, Green Leaf Lettuce, Yellow onions, Oranges, Sno Peas, Red Bell Peppers, Tomatoes
Friday, March 30, 2012
Ethiopian Cabbage
1/4 cup olive oil
2 tsp minced garlic
4 carrots, thinly sliced
1 onion, thinly sliced
1 teaspoon sea salt
1/2 teaspoon ground black pepper
1 teaspoon ground cumin
1/2 teaspoon ground turmeric
1/2 teaspoon ground ginger
1 head cabbage, shredded
5 potatoes, peeled and cut into 1-inch cubes
Heat olive oil in a large pot over medium-high heat. Saute the carrots, onion, and garlic about 5 minutes. Stir in the salt, pepper, cumin, turmeric, and cabbage and cook another 15 to 20 minutes. Add the potatoes; cover. Reduce heat to medium-low and cook until potatoes are soft, 20 to 30 minutes.
Our absolute favorite way to prepare cabbage!
Tuesday, March 20, 2012
Produce ordered for March 21st
Fuji apples, Gala Apples, Golden Delicious apples, Bananas, Green Beans, Strawberries, Carrots, Cauliflower, Grapefruit, Kiwi, Red Leaf Lettuce, Red Bell Peppers, Pineapple, Cherry tomatoes
Wednesday, March 14, 2012
Roasted garlic and citrus zest (but probably not together)
Our family loves roasted garlic. It is delicious in so many things. This page shows photos of the easiest way we have found to roast garlic:
http://simplyrecipes.com/recipes/roasted_garlic/
Also, I've found that I often use citrus juice in a recipe but not the zest or vice versa. You can zest citrus fruits and juice them at the same time, then freeze the zest or the juice in ice cube trays to use later.
http://simplyrecipes.com/recipes/roasted_garlic/
Also, I've found that I often use citrus juice in a recipe but not the zest or vice versa. You can zest citrus fruits and juice them at the same time, then freeze the zest or the juice in ice cube trays to use later.
Tuesday, March 13, 2012
Produce ordered for March 14th
Fuji Apples, Gala Apples, Asparagus, Bananas, Strawberries, Broccoli, Carrots, Cucumbers, Limes, Oranges, Pears, Red Bell Peppers, Idaho Potatoes, Spinach
Tuesday, February 28, 2012
Produce ordered for February 29th
Fuji Apples, Gala Apples, Golden delicious Apples, Bananas, Asparagus, Avocados, Broccoli, Carrots, Cauliflower, Cucumbers, Yellow onions, Oranges, Pineapples, Yellow Squash, Cherry Tomatoes
Monday, February 20, 2012
Roasted Vegetable Stir Fry
Here's a great way to use vegetables. It's easy and brings out the wonderful flavors of the vegetables.
Ingredients:
1 Pound Vegetables, cut into bite size (Zucchini, Squash, Peas in Pods, Carrots, Celery, Asparagus, Broccoli, Cauliflower, Onions, etc.)
1 1/2 Tablespoons Olive oil
1/2 teaspoon Salt
1/4 teaspoon Pepper
Instructions:
Mix all ingredients together in pan. Cook at 450°F for 30 minutes. Serve with rice.
Tuesday, February 7, 2012
Ginger root
I meant to post this several days ago, but I trust all of you from last week's co-op still have some ginger lying around! Are you wondering what to do with it? Here are several ideas:
1. The easiest way to peel ginger root is with a spoon. It just scrapes off!
2. The best way to store ginger is in the refrigerator or freezer. It lasts a couple of weeks in the fridge but before it goes bad, stick it in the freezer. You can peel it (or not) and just stick it in a ziploc bag. Then, whenever you need some you can just peel and grate it straight from the freezer!
3. Refreshing drink! Place a few tablespoons of grated ginger in a small jar and fill the rest of the way with honey and keep it in the fridge. Stir a tablespoon or two into some cold or sparkling water and add a squeeze of lemon.
4. Ginger is a great medicine! Use the same (see #3) honey/ginger mixture in some hot water to soothe a sore throat, ease a cold or calm an upset stomach!
5. Here are a couple of recipes using ginger:
Asian Salad Dressing
1 tsp. orange zest
juice from 1/2 large orange
1 tsp. finely grated ginger
2 Tbsp. rice vinegar
1-2 tsp. honey
1/4 c. light oil (such as grapeseed or safflower)
Wisk ingredients together. Serve with salad. Store in refrigerator.
Homemade Teriyaki Sauce
1/4 c. liquid aminos or soy sauce
1/4 c. rice vinegar, unsweetened
1/4 c. water
1 tsp. molasses
1/4 tsp. stevia
2 green onions
1 garlic clove, minced
1 tsp. fresh grated ginger
1 Tbsp. cornstarch
Bring all ingredients, except cornstarch, to a boil. Reduce heat and simmer 2-4 minutes. Stir cornstarch into a couple tablespoons of cold water until dissolved. Remove green onions from sauce and stir in cornstarch. Simmer until desired thickness is achieved.
Use any way you would use teriyaki sauce or slather over grilled chicken breasts and serve in a bun with grilled pineapple slices. Yum!
Easy Noodle Stir Fry
2-4 cups fresh or frozen veggies of your choice (broccoli, carrots, peas, peppers, corn, zucchini, squash, etc.)
3 Tablespoons olive oil
1 clove minced fresh garlic or 1/2 teaspoon garlic powder
1-2 tsp. fresh grated ginger
10 ounces whole wheat spaghetti noodles
liquid aminos or soy sauce (to taste)
Sea salt (to taste)
oyster sauce, optional (to taste)
In a skillet, toss vegetables and olive oil together – cooking on medium heat until veggies are tender. Add ginger and garlic and cook for another minute. In the meantime, boil the spaghetti noodles in water and drain. Stir cooked veggies and noodles together. Add soy sauce, stirring until the noodles are barely coated. Add sea salt (and more soy sauce) if desired.
Enjoy your ginger!
Tuesday, January 24, 2012
Produce Ordered for January 25th
Fuji Apples, Gala apples, Avocados, Bananas, Green Beans, Broccoli, Carrots, Cucumber, Mango, Mushrooms, Pears, Clementines, Roma Tomatoes
Tuesday, January 17, 2012
Produce ordered for January 18th
Gala apples, pink lady apples, banana, broccoli, cauliflower, kiwi, green leaf lettuce, mushrooms, yellow onions, pears, clementines, cherry tomatoes
Thursday, January 5, 2012
Roasted cabbage with lemon
Roasted Cabbage with Lemon
Makes 3-4 servings as a side dish, recipe adapted slightly from Roasted Cabbage with Lemon at Eat Repeat.
1 medium-sized head of green cabbage
2 T olive oil
2-3 T fresh squeezed lemon juice (I used 2 T for the cabbage in these photos, but next time I'd use even more lemon)
generous amount of sea salt and fresh ground black pepper
lemon slices, for serving cabbage (optional)
Preheat oven to 450F/232C. Spray a roasting pan with non-stick spray or olive oil.
Cut the head of cabbage into 8 same-size wedges, cutting through the core and stem end. Then carefully trim the core strip and stem from each wedge and arrange wedges in a single layer on the roasting pan (leave some space around them as much as you can.)
Whisk together the olive oil and lemon juice (use the larger amount of lemon juice if you like a lot of lemon like I do.) Then use a pastry brush to brush the top sides of each cabbage wedge with the mixture and season generously with salt and fresh ground black pepper. Turn cabbage wedges carefully, then brush the second side with the olive oil/lemon juice mixture and season with salt and pepper.
Roast cabbage for about 15 minutes, or until the side touching the pan is nicely browned. Then turn each wedge carefully and roast 10-15 minutes more, until the cabbage is nicely browned and cooked through with a bit of chewiness remaining. Serve hot, with additional lemon slices to squeeze lemon juice on at the table if desired.
Three-Day Cabbage Salad
1 head cabbage
1 green pepper
1 carrot
1 medium onion
1/4 c. honey
3/4 c. safflower oil (or other mild flavor oil)
1 c. apple cider vinegar
1 1/2 tsp. salt
1 tsp. celery seed
Shred the cabbage and grate the carrot. Chop the pepper and onion. Toss all in a bowl.
In a small saucepan combine the honey, oil, vinegar, salt and celery seed. Bring to a boil, then immediately pour over vegetables. Allow the salad to cool slightly, tossing a few times. Place in covered container and refrigerate for at least 3 days before serving. Will last at least 1 week, maybe more!
*This is a great alternative to a traditional cole slaw and healthier. My family (who most of them are NOT cole slaw fans) loved this!
What to do with all that Parsley?
Here are a few recipes using parsley. Many recipes call for Italian or flat leaf parsley, the curly variety can be easily substituted in any recipe.
Argentinian Chimichurri Sauce
This sauce is typically used to marinate or accompany a variety of meats and fish, but tastes great with vegetables.
A Lebanese salad
Argentinian Chimichurri Sauce
This sauce is typically used to marinate or accompany a variety of meats and fish, but tastes great with vegetables.
- cups fresh parsley and/or cilantro, firmly packed
- 1/4 cup fresh oregano leaves (optional) (substitute dried)
- 3-6 cloves of garlic
- 2 tablespoons chopped onion
- 1/2 cup olive oil
- 2 tablespoons red wine vinegar (optional)
- 1 tablespoon lime juice (optional)
- Kosher salt and red pepper flakes to taste
- Pulse the garlic and onion in the food processor until finely chopped.
- Add the parsley and/or cilantro, and oregano if using, and pulse briefly, until finely chopped.
- Transfer the mixture to a separate bowl. Add the olive oil, lime juice, and vinegar, and stir. (Adding the liquids outside of the blender gives the chimichurri the correct texture. You don't want the herbs to be completely puréed, just finely chopped).
- Season with salt and red pepper flakes to taste.
- Store in the refrigerator until ready to serve
A Lebanese salad
Ingredients
- 1 cup bulghur wheat
- 1 1/2 cups boiling water
- 1/4 cup freshly squeezed lemon juice (2 lemons)
- 1/4 cup good olive oil
- 3 1/2 teaspoons kosher salt
- 1 cup minced scallions, white and green parts (1 bunch)
- 1 cup chopped fresh mint leaves (1 bunch)
- 1 cup chopped flat-leaf parsley (1 bunch)
- 1 hothouse cucumber, unpeeled, seeded, and medium-diced
- 2 cups cherry tomatoes, cut in half
- 1 teaspoon freshly ground black pepper
Place the bulghur in a large bowl, pour in the boiling water, and add the lemon juice, olive oil, and 1 1/2 teaspoons salt. Stir, then allow to stand at room temperature for about 1 hour.
Add the scallions, mint, parsley, cucumber, tomatoes, 2 teaspoons salt, and the pepper; mix well. Season, to taste, and serve or cover and refrigerate. The flavor will improve if the tabbouleh sits for a few hours.
Subscribe to:
Posts (Atom)